


This website uses cookies to help improve your user experience


WebRTC allows for video calls and screen sharing through a web browser, without the need for a plugin. This advancing technology is improving the effectiveness of e-learning, customer support, and just about any service that relies on real-time communication (RTC).
And a brilliant way to improve how users communicate is to augment RTC with annotations. In fact — it’s the nitty-gritty of implementing annotations that you’ll learn about in this guide.
The support for annotations is currently being developed by TokBox for OpenTok — their WebRTC cloud platform. This groundbreaking widget was announced in late 2015, and it’s still in beta at the time of this writing.
TokBox’s Annotation Widget includes the following features:
TokBox’s platform is appealing, because their SDKs are available for iOS and Android, and they’ve even developed a plugin for Microsoft’s Internet Explorer. So as we wait for browser vendors to adopt the proposed WebRTC standards, a RTC application built upon OpenTok can support a range of devices today.
So now that an overview of real-time annotations has been given, let’s jump into a hands-on exploration of the Annotation Widget’s JavaScript library.
To start working with WebRTC annotations in 5 – 10 minutes, just follow our step-by-step instructions for deploying the OpenTok widget on Heroku’s Cloud PaaS for free:
To modify your Heroku application, click on the OpenTok app listed on your Heroku Dashboard, then click the Deploy tab. Here you’ll find clear instructions for syncing local code changes through Dropbox, GitHub, or Heroku’s Toolbelt.
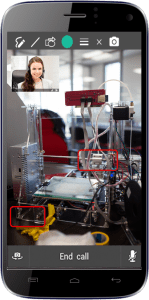
TokBox’s Annotation Widget is available to the browser client through a customizable toolbar. And the toolbar is represented within JavaScript as a configurable object:
// Initialize a toolbar for controlling annotation canvases
toolbar = new OTSolution.Annotations.Toolbar({
    session: session,
    container: document.getElementById('toolbar'),
    colors: palette,
    items: [] // Menu items are defined within this collection
{)
The annotation toolbar can be configured with several predefined menu items:
Adding menu items, changing icons, or adjusting the color palette is straightforward to accomplish. Here’s an example of how a custom Pen Tool icon can be specified:
// Initialize a toolbar for controlling annotation canvases
toolbar = new OTSolution.Annotations.Toolbar({
    session: session,
    container: document.getElementById('toolbar'),
    colors: palette,
    items: [ // Menu item configuration
        {
            id: 'OT_pen',
            title: 'Pen',
            icon: 'image/draw39.png',
            selectedIcon: 'image/draw39-gray.png'
        },
        ...
    ]

    ...
})
Event handlers enable significant control over the Annotation Widget’s behavior. Menu item click events propagate the menu item ID to a predefined callback. And it’s here where custom event handlers should be defined:
toolbar.itemClicked(function (id) {
    // Handle the event
});
If you want to display a custom color palette when clicking the Colors menu item, this is how an event handler can do so:
// Callback for handling menu actions
toolbar.itemClicked(function (id) {
    console.log("Callback item id: " + id);

    if(id == 'OT_colors')
    {
        //show custom color picker (jscolor.com)
        document.getElementById('toolbar-palette').jscolor.show()
    }
});
Note that the screen capture event has a special callback:
// Callback for screen capture event
canvas.onScreenCapture(function (dataUrl) {
    var win = window.open(dataUrl, '_blank');
    win.focus();
});
By making the image’s dataUrl available to the above function, it’s possible to integrate sharing tools (Tweeting, Facebook, email, etc.), or to persist an image to a cloud drive via Dropbox’s API.
The Annotation Widget is not limited to predefined drawing tools. A shape can be specified through a collection of line points. For a great example of this, take a look at how a star is defined:
// Initialize a toolbar for controlling annotation canvases
toolbar = new OTSolution.Annotations.Toolbar({
items: [
        {
            id: 'OT_shapes',
            title: 'Shapes',
            icon: 'image/shapes.png',
            items: [
                {
                    id: 'OT_star',
                    title: 'Star',
                    icon: 'image/star.png',
                    points: [
                        [0.5 + 0.5 * Math.cos(90 * (Math.PI / 180)),
                        0.5 + 0.5 * Math.sin(90 * (Math.PI / 180))],
                        [0.5 + 0.25 * Math.cos(126 * (Math.PI / 180)),
                        0.5 + 0.25 * Math.sin(126 * (Math.PI / 180))],
                        [0.5 + 0.5 * Math.cos(162 * (Math.PI / 180)),
                        0.5 + 0.5 * Math.sin(162 * (Math.PI / 180))],
                        [0.5 + 0.25 * Math.cos(198 * (Math.PI / 180)),
                        0.5 + 0.25 * Math.sin(198 * (Math.PI / 180))],
                        [0.5 + 0.5 * Math.cos(234 * (Math.PI / 180)),
                        0.5 + 0.5 * Math.sin(234 * (Math.PI / 180))],
                        [0.5 + 0.25 * Math.cos(270 * (Math.PI / 180)),
                        0.5 + 0.25 * Math.sin(270 * (Math.PI / 180))],
                        [0.5 + 0.5 * Math.cos(306 * (Math.PI / 180)),
                        0.5 + 0.5 * Math.sin(306 * (Math.PI / 180))],
                        [0.5 + 0.25 * Math.cos(342 * (Math.PI / 180)),
                        0.5 + 0.25 * Math.sin(342 * (Math.PI / 180))],
                        [0.5 + 0.5 * Math.cos(18 * (Math.PI / 180)),
                        0.5 + 0.5 * Math.sin(18 * (Math.PI / 180))],
                        [0.5 + 0.25 * Math.cos(54 * (Math.PI / 180)),
                        0.5 + 0.25 * Math.sin(54 * (Math.PI / 180))],
                        [0.5 + 0.5 * Math.cos(90 * (Math.PI / 180)),
                        0.5 + 0.5 * Math.sin(90 * (Math.PI / 180))]
                    ]
                }
            ]
        },
        ...
    ]
    ...
})
The Annotation Widget is in beta for a reason. Significant functionality is still missing, and a few usability quirks exist. Most notably, native support for moving and resizing on-screen annotations is lacking, and the Pen Tool is not always 100% accurate.
However, there’s huge potential for WebRTC annotations. Especially if the feature set expands to what users have come to expect within modern annotation tools; highlighting, annotation resizing, and smoother brush strokes. Features that we anticipate to see once TokBox’s widget is out of beta.
And the OpenTok Annotation Widget is just another reason for why we’re proud to be an official partner of TokBox, here at Oxagile. So if you’re in need of a custom WebRTC solution for your business — contact us today — and learn how our software development services can meet your needs.

