


This website uses cookies to help improve your user experience


Building scalable real-time systems starts with choosing the right foundation.
Erlang/OTP is known for its unmatched concurrency model, and Cowboy extends its capabilities with an elegant way to manage HTTP and WebSocket communication.
In this article, we explore how to implement and maintain WebSocket connections in an Erlang application using Cowboy, from adding dependencies to creating a custom handler ready for production workloads.
Basically, when one needs an Erlang/OTP application to communicate with the world via HTTP or WebSockets, it’s a really great idea to use the Cowboy webserver. So, here are a couple of advantages of using it:
What this means for you: if you build an application that requires Erlang WebSocket interaction, whether on the client or server side, Cowboy offers a robust and reliable foundation. The Erlang Cowboy WebSocket implementation enables persistent bidirectional communication with minimal overhead. Moreover, upgrades in the ecosystem (for instance, Cowboy 2.x support for modern Erlang/OTP 26+) mean that choosing this stack now positions your architecture for long-term scalability and maintainability.
At Oxagile, we leverage this architecture when an OTP-based subsystem must open WebSocket channels to external services or accept high-volume persistent client connections. By adopting the pattern of a dedicated handler process per connection, we fully utilize the BEAM VM’s concurrency model for real-time, high-load environments.
Here at Oxagile we use rebar as a build tool. Basically, it’s like a composer for PHP applications but much more advanced. So, to add cowboy as a dependency, we should update our rebar.config file by adding the following row into the deps section:
{deps, [
  {
    cowboy,
    ".*",
    {git, "https://github.com/extend/cowboy.git", {tag, "1.0.3"}}
  },

  % other dependencies
  {
    mochijson2,
    ".*",
    {git, "https://github.com/tel/mochijson2.git", {tag, "2.3.2"}}
  },
  {
    amqp_client,
    ".*",
    {git, "git://github.com/jbrisbin/amqp_client.git", {tag, "3.5.2"}}
  }
]}
Then just go to a console and run: $ rebar get deps.
Rebar3 automatically handles dependency fetching and compilation, providing a stable and consistent workflow for Erlang/OTP applications.
Then update your *_app.src file by adding Cowboy entry to the applications section. Therefore, when you pack your application into release, Cowboy will be started automatically upon release launch.
{application, demo,
[
 {description, "ws demo app"},
 {vsn, "0.0.1"},
 {registered, []},
 {applications, [
                 kernel,
                 stdlib,
                 inets,
                 cowboy,
                 mnesia
                ]},
 {mod, { demo_app, []}},
 {env, [  ]}
]}.
This configuration ensures that Cowboy starts together with your application and runs under the OTP supervision tree, managing HTTP and Erlang WebSocket connections according to your routing setup.
Let’s say that our application name is demo. So, you should have a demo_app.erl file inside your src folder. Let’s modify it by adding some configuration for Cowboy. First of all, we will configure routing and ports Cowboy will listen to.
-module(demo_app).

-behaviour(application).

-export([start/2, stop/1]).

start(_StartType, _StartArgs) ->

 Dispatch = cowboy_router:compile([
   {'_', [
       {"/ws", demo_cowboy_handler_ws, []},
       {"/auth/:token/:user", demo_cowboy_handler_rest, [auth]},
   ]}
 ]),

 {ok, _} = cowboy:start_http(http, 100, [{port, 8889}], [{env, [{dispatch, Dispatch}]}]),
 demo_sup:start_link().

stop(_State) ->
  ok.
In this example, Cowboy is configured to handle both HTTP and WebSocket routes within the same Erlang application. The /ws endpoint is managed by the Erlang cowboy WebSocket handler, while /auth/:token/:user is served by a REST handler.
Cowboy 2.x uses the start_clear/3 and start_tls/3 functions instead of start_http, which provides better flexibility and support for modern TLS configurations.
It’s also possible to listen on multiple ports. To do so, call cowboy:start_clear or cowboy:start_tls multiple times, giving each listener a unique name.
For example:
start(_StartType, _StartArgs) ->

 DispatchWs = cowboy_router:compile([
   {'_', [
       {"/ws", demo_cowboy_handler_ws, []}
   ]}
 ]),

 DispatchRest = cowboy_router:compile([
   {'_', [
       {"/auth/:token/:user", demo_cowboy_handler_rest, [auth]}
   ]}
 ]),

 {ok, _} = cowboy:start_http(ws, 100, [{port, 8889}], [{env, [{dispatch, DispatchWs}]}]),
 {ok, _} = cowboy:start_http(http, 100, [{port, 8888}], [{env, [{dispatch, DispatchRest}]}]),
 demo_sup:start_link().
This setup keeps HTTP and WebSocket traffic separate, ensuring clean routing and better performance management inside the Erlang VM. The Erlang WebSocket connections created this way run as lightweight processes, fully supervised under OTP — a major advantage for scalability and fault tolerance.
The last thing left to do is just create a handler for websocket connections. It is a regular Erlang module but it should be “inherited” from the cowboy_websocket_handler. Erlang behaviours are great because they have a well defined interface: a set of callback functions with custom implementation but with defined input and output. For the Erlang Cowboy WebSocket implementation, these functions are:
on but with defined input and output. So, for cowboy_websocket_handler these functions are:
init/2 — initializes the connection (see below)websocket_init/1 — sets up the initial state for the WebSocket processwebsocket_handle/2 — handles frames received from the clientwebsocket_info/2 — handles internal Erlang messagesterminate/3 — called before the WebSocket process endsYou can also pass initialization parameters through the router configuration, for example:
DispatchWs = cowboy_router:compile([
   {'_', [
       {"/ws", demo_cowboy_handler_ws, [SomeConfigParams]}
   ]}
 ]),
The third parameter (Opts) in the websocket_init callback receives these custom parameters. This makes it easy to adapt your Erlang WebSocket handler for different environments or configuration modes.
Here’s an example of a simple WebSocket handler module:
-module(demo_cowboy_handler_ws).
-behaviour(cowboy_websocket_handler).
-export([init/3]).
-export([
   websocket_init/3, websocket_handle/3,
   websocket_info/3, websocket_terminate/3
]).

init({tcp, http}, _Req, _Opts) ->
 {upgrade, protocol, cowboy_websocket}.

websocket_init(_TransportName, Req, Opts) ->
 {ok, Req, undefined_state}.

websocket_handle({text, Msg}, Req, State) ->
 {reply, {text, << "responding to ", Msg/binary >>}, Req, State, hibernate }.

websocket_info({data, SomeData}, Req, State) ->
 {reply, {text, SomeData}, Req, State};
websocket_info(_Info, Req, State) ->
 {ok, Req, State, hibernate}.

websocket_terminate(_Reason, _Req, _State) ->
 ok.
Cowboy 2.x simplifies the callback structure by reducing the number of arguments, while preserving full control over WebSocket communication. Each connection runs as a lightweight Erlang process, allowing your Erlang WebSocket server to handle tens of thousands of clients concurrently with minimal memory footprint.
To send data to a connected client, simply send a message to the process running this handler — for example:
WsPid ! {data, <<"Hello from server!">>}.This message will be handled by websocket_info/2 and delivered as a WebSocket frame.
That’s all you need to build a simple but production-ready Erlang WebSocket client-server communication model using Cowboy.
Let’s say we have a software solution which includes a number of modules implemented using different technologies like in example below:
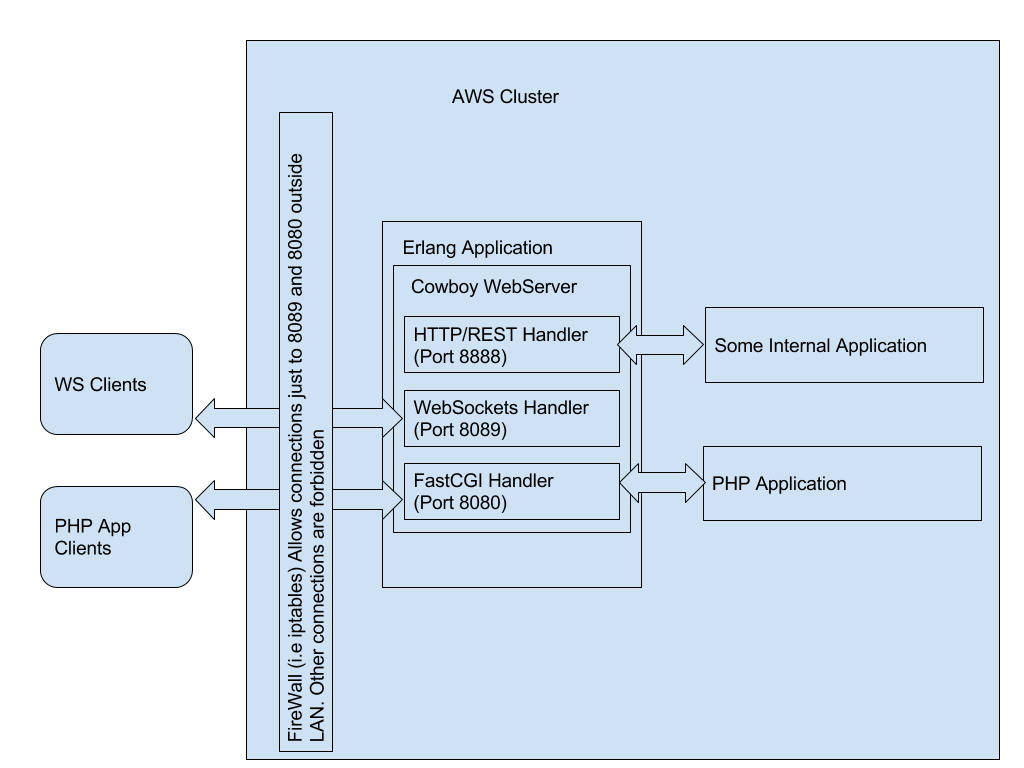
So, we have WebSocket Clients and PHP App clients (most likely these are 2 parts of one JavaScript application). This application makes HTTP requests via the 8080 port and uses the 8089 port to establish WS connections.
In order to handle these connections we have 2 separate Cowboy handlers created. All other connections are forbidden by the firewall. But, inside our cluster (LAN) we have all the connections allowed. So our internal application can make requests to Cowboy and its rest handler which is hidden from the World.
This approach allows both REST and WebSocket endpoints to coexist efficiently within one Erlang/OTP application, using the same supervision and concurrency model. It keeps the architecture simple, scalable, and easy to maintain even when thousands of Erlang WebSocket connections are active at the same time.
The Erlang Cowboy WebSocket framework provides a reliable way to combine low-latency communication with high system stability, enabling developers to build real-time systems that stay responsive under load.
Oxagile’s Erlang engineers can help you design, optimize, and scale robust WebSocket-driven systems tailored to your business goals.

